关于TLS1.3
在OpenSSL的github开源项目中我们可以看到最新的tag为OpenSSL_1_1_1,该版本为TLS1.3正式版。
更新:2018/09/12 昨天前OpenSSL_1_1_1发布了,已更新。
更多TLS v1.3内容看这里
nginx 更新到v1.15.8
从OpenSSL的博客中,我们知道TLS1.3与1TLS1.2的主要差异有以下几点:
- 有新的套件,旧的套件无法用在1.3连接中;
- 套件的定义与以往不一样,新的套件不指定证书类型(eg:RSA,DSA,ECDSA)以及秘钥交换机制(eg:DHE,ECDHE) ;
- 客户在
ClientHello中提供key_share。这对group配置有影响;(这个group是什么,我还没去研究) - 会话直到主要握手完成后才建立;
- 不支持重协商;
- 更多的握手被加密;
- 更多类型的消息可以扩展;
- 弃用DSA证书。(DSA貌似现在也没怎么见)
编译Nginx
我的服务器:CentOS 7.4 64位
其实编译nginx很多人都写过,我这里主要参考ququ大神的博客配置的。
安装依赖
# 安装开发工具
sudo yum groupinstall -y "Development Tools"
# 安装依赖
sudo yum install -y git wget zlib zlib-devel pcre-devel lua-devel
获取组件
这部分主要是按照曲曲的配置来的,我就不细说。
# 启用CT功能的nginx-ct
wget -O nginx-ct.zip -c https://github.com/grahamedgecombe/nginx-ct/archive/v1.3.2.zip
unzip nginx-ct.zip

# Google的Brotli 压缩算法,减少流量
git clone https://github.com/bagder/libbrotli
cd libbrotli
./autogen.sh
./configure
make
sudo make install
cd  ../

# 获取ngx-brotli源码
git clone https://github.com/google/ngx_brotli.git
cd ngx_brotli

git submodule update --init
cd ../
OpenSSL
下载GitHub上最新的pre6版本即可。
wget https://codeload.github.com/openssl/openssl/tar.gz/OpenSSL_1_1_1
tar -zxvf OpenSSL_1_1_1
mv openssl-OpenSSL_1_1_1 openssl
编译安装Nginx
获取 Nginx 源码:
wget -c https://nginx.org/download/nginx-1.15.8.tar.gz
tar -zxvf nginx-1.15.8.tar.gz
cd nginx-1.15.8/
编译以及安装
./configure --add-module=../ngx_brotli --add-module=../nginx-ct-1.3.2 --with-openssl=../openssl --with-http_v2_module --with-http_ssl_module --with-http_gzip_static_module

make
sudo make install
这一步完成,会给你一些提示,其中一些路径它会打印出来,configure时没指定就会使用默认的,如下。
nginx path prefix: “/usr/local/nginx”
nginx binary file: “/usr/local/nginx/sbin/nginx”
nginx modules path: “/usr/local/nginx/modules”
nginx configuration prefix: “/usr/local/nginx/conf”
nginx configuration file: “/usr/local/nginx/conf/nginx.conf”
nginx pid file: “/usr/local/nginx/logs/nginx.pid”
nginx error log file: “/usr/local/nginx/logs/error.log”
nginx http access log file: “/usr/local/nginx/logs/access.log”
nginx http client request body temporary files: “client_body_temp”
nginx http proxy temporary files: “proxy_temp”
nginx http fastcgi temporary files: “fastcgi_temp”
nginx http uwsgi temporary files: “uwsgi_temp”
nginx http scgi temporary files: “scgi_temp”
完成后可以将nginx加入到path中,或软链进去的。
ln /usr/local/nginx/sbin/nginx /usr/local/bin/nginx
查看一下是否安装正确:
$ nginx -V
nginx version: nginx/1.15.8
built by gcc 4.8.5 20150623 (Red Hat 4.8.5-36) (GCC)
built with OpenSSL 1.1.1  11 Sep 2018
TLS SNI support enabled
configure arguments: --add-module=../ngx_brotli --add-module=../nginx-ct-1.3.2 --with-openssl=../openssl --with-http_v2_module --with-http_ssl_module --with-http_gzip_static_module
OpenSSL 1.1.1与nginx/1.15.8 看来已经OK了。
管理脚本与自启
sudo vim /etc/init.d/nginx
输入以下内容:
#! /bin/sh

### BEGIN INIT INFO
# Provides:          nginx
# Required-Start:    $all
# Required-Stop:     $all
# Default-Start:     2 3 4 5
# Default-Stop:      0 1 6
# Short-Description: starts the nginx web server
# Description:       starts nginx using start-stop-daemon
### END INIT INFO

PATH=/usr/local/sbin:/usr/local/bin:/sbin:/bin:/usr/sbin:/usr/bin
DAEMON=/usr/local/nginx/sbin/nginx
NAME=nginx
DESC=nginx

test -x $DAEMON || exit 0

# Include nginx defaults if available
if [ -f /etc/default/nginx ] ; then
  . /etc/default/nginx
fi

set -e

. /lib/lsb/init-functions

case "$1" in
  start)
    echo -n "Starting $DESC: "
    start-stop-daemon --start --quiet --pidfile /usr/local/nginx/logs/$NAME.pid \
        --exec $DAEMON -- $DAEMON_OPTS || true
    echo "$NAME."
    ;;
  stop)
    echo -n "Stopping $DESC: "
    start-stop-daemon --stop --quiet --pidfile /usr/local/nginx/logs/$NAME.pid \
        --exec $DAEMON || true
    echo "$NAME."
    ;;
  restart|force-reload)
    echo -n "Restarting $DESC: "
    start-stop-daemon --stop --quiet --pidfile \
        /usr/local/nginx/logs/$NAME.pid --exec $DAEMON || true
    sleep 1
    start-stop-daemon --start --quiet --pidfile \
        /usr/local/nginx/logs/$NAME.pid --exec $DAEMON -- $DAEMON_OPTS || true
    echo "$NAME."
    ;;
  reload)
    echo -n "Reloading $DESC configuration: "
    start-stop-daemon --stop --signal HUP --quiet --pidfile /usr/local/nginx/logs/$NAME.pid \
        --exec $DAEMON || true
    echo "$NAME."
    ;;
  status)
    status_of_proc -p /usr/local/nginx/logs/$NAME.pid "$DAEMON" nginx && exit 0 || exit $?
    ;;
  *)
    N=/etc/init.d/$NAME
    echo "Usage: $N {start|stop|restart|reload|force-reload|status}" >&2
    exit 1
    ;;
esac

exit 0
增加执行权限:
sudo chmod a+x /etc/init.d/nginx
现在管理 Nginx 只需使用以下命令即可:
sudo service nginx start|stop|restart|reload
如果启动出现错误Starting nginx: /etc/init.d/nginx: line 32: start-stop-daemon: command not found,那是start-stop-daemon工具没有安装,可按照以下方式安装。
wget http://developer.axis.com/download/distribution/apps-sys-utils-start-stop-daemon-IR1_9_18-2.tar.gz
tar zxf apps-sys-utils-start-stop-daemon-IR1_9_18-2.tar.gz
mv apps/sys-utils/start-stop-daemon-IR1_9_18-2/ ./
rm -rf apps
cd start-stop-daemon-IR1_9_18-2/
cc start-stop-daemon.c -o start-stop-daemon
cp start-stop-daemon /usr/local/bin/start-stop-daemon
cd ../
开机自动启动 Nginx,执行以下命令:
sudo chkconfig nginx on
Nginx配置
最后贴以下我的nginx全局配置以及博客配置。
全局配置vim /usr/local/nginx/conf/nginx.conf
http {
    include       mime.types;
    default_type  application/octet-stream;

    #log_format  main  '$remote_addr - $remote_user [$time_local] "$request" '
    #                  '$status $body_bytes_sent "$http_referer" '
    #                  '"$http_user_agent" "$http_x_forwarded_for"';

    #access_log  logs/access.log  main;

    charset UTF-8;

    sendfile        on;
    tcp_nopush      on;
    tcp_nodelay     on;

    #keepalive_timeout  0;
    keepalive_timeout  65;

    gzip           on;
    gzip_vary      on;

    gzip_comp_level    6;
    gzip_buffers       16 8k;

    gzip_min_length    1000;
    gzip_proxied       any;
    gzip_disable       "msie6";

    gzip_http_version  1.0;

    gzip_types         text/plain text/css application/json application/x-javascript text/xml application/xml application/xml+rss text/javascript application/javascript image/svg+xml;

    # 如果编译时添加了 ngx_brotli 模块,需要增加 brotli 相关配置
    brotli             on;
    brotli_comp_level  6;
    brotli_types       text/plain text/css application/json application/x-javascript text/xml application/xml application/xml+rss text/javascript application/javascript image/svg+xml;

    include            /www/*/*.conf;
}
博客配置 vim /www/blog/nginx.conf
server {
    listen                       443 ssl default http2 fastopen=3 reuseport;

    server_name                  razeen.me www.razeen.me blog.netcj.com;
    server_tokens                off;

    access_log                   /www/blog/logdata/nginx.log;

    # ip 黑名单
    include                      /www/blog/ip.blacklist;

    # 现在一般证书是内置的。letsencrypt 暂未
    # https://imququ.com/post/certificate-transparency.html#toc-2
    # ssl_ct                       on;
    # ssl_ct_static_scts           /www/blog/scts/rsa/;
    # ssl_ct_static_scts           /www/blog/scts/ecc/;


    # 中间证书 + 根证书
    # https://imququ.com/post/why-can-not-turn-on-ocsp-stapling.html
    ssl_trusted_certificate      /www/blog/ca_file.pem;

    # 站点证书 + 中间证书,私钥
    ssl_certificate              /root/.acme.sh/netcj.com/fullchain.cer;
    ssl_certificate_key          /root/.acme.sh/netcj.com/netcj.com.key;
    ssl_certificate              /root/.acme.sh/netcj.com_ecc/fullchain.cer;
    ssl_certificate_key          /root/.acme.sh/netcj.com_ecc/netcj.com.key;

    # openssl dhparam -out dhparams.pem 2048
    # https://weakdh.org/sysadmin.html
    ssl_dhparam                  /www/blog/dhparams.pem;

    # openssl rand 48 > session_ticket.key
    # 单机部署可以不指定 ssl_session_ticket_key
    # ssl_session_ticket_key     /www/blog/session_ticket.key;

    # https://github.com/cloudflare/sslconfig/blob/master/conf
    # ssl_ciphers               EECDH+CHACHA20:EECDH+CHACHA20-draft:EECDH+AES128:RSA+AES128:EECDH+AES256:RSA+AES256:EECDH+3DES:RSA+3DES:!MD5;

    # 如果启用了 RSA + ECDSA 双证书,Cipher Suite 可以参考以下配置:
    # ssl_ciphers                 EECDH+CHACHA20:EECDH+CHACHA20-draft:EECDH+ECDSA+AES128:EECDH+aRSA+AES128:RSA+AES128:EECDH+ECDSA+AES256:EECDH+aRSA+AES256:RSA+AES256:EECDH+ECDSA+3DES:EECDH+aRSA+3DES:RSA+3DES:!MD5;

    # TLS 1.3
    ssl_ciphers                 TLS13-AES-256-GCM-SHA384:TLS13-CHACHA20-POLY1305-SHA256:TLS13-AES-128-GCM-SHA256:TLS13-AES-128-CCM-8-SHA256:TLS13-AES-128-CCM-SHA256:EECDH+CHACHA20:EECDH+CHACHA20-draft:EECDH+ECDSA+AES128:EECDH+aRSA+AES128:RSA+AES128:EECDH+ECDSA+AES256:EECDH+aRSA+AES256:RSA+AES256:EECDH+ECDSA+3DES:EECDH+aRSA+3DES:RSA+3DES:!MD5;
ssl_prefer_server_ciphers    on;
    ssl_protocols                TLSv1 TLSv1.1 TLSv1.2 TLSv1.3;
    ssl_session_cache            shared:SSL:50m;
    ssl_session_timeout          1d;
    ssl_session_tickets          on;

    # ssl stapling
    ssl_stapling                 on;
    ssl_stapling_verify          on;
    resolver                     114.114.114.114 8.8.8.8 valid=300s;
    resolver_timeout             10s;

    if ($request_method !~ ^(GET|HEAD|POST|OPTIONS)$ ) {
        return                   444;
    }

    #if ($host != 'razeen.me' ) {
    #   rewrite                  ^/(.*)$  https://razeen.me/$1 permanent;
    #}

    # webmaster 站点验证相关
    location ~* (google4c90d18e696bdcf8\.html|BingSiteAuth\.xml)$ {
        root                     /www/blog/static;
        expires                  1d;
    }

    location ^~ /admin/ {
        proxy_http_version       1.1;

        add_header               Strict-Transport-Security "max-age=31536000; includeSubDomains; preload";

        # deny 将完全不允许页面被嵌套,可能会导致一些异常。如果遇到这样的问题,建议改成 SAMEORIGIN
        # https://imququ.com/post/web-security-and-response-header.html#toc-1
        add_header               X-Frame-Options deny;
        add_header               X-Powered-By eiblog/1.3.0;
        add_header               X-Content-Type-Options nosniff;

        proxy_set_header         Connection       "";
        proxy_set_header         Host             razeen.me;
        proxy_set_header         X-Real_IP        $remote_addr;
        proxy_set_header         X-Forwarded-For  $proxy_add_x_forwarded_for;

        proxy_pass               http://127.0.0.1:9000;
    }

    location / {
        proxy_http_version       1.1;

        add_header               Strict-Transport-Security "max-age=31536000; includeSubDomains; preload";
        add_header               X-Frame-Options deny;
        add_header               X-Content-Type-Options nosniff;
        add_header               Content-Security-Policy "default-src 'none'; script-src 'unsafe-inline' 'unsafe-eval' blob: https:; img-src data: https: https://st.razeen.me; media-src https://st.razeen.me; style-src 'unsafe-inline' https:; child-src https:; connect-src 'self' https://translate.googleapis.com; frame-src https://disqus.com https://www.slideshare.net";


# 中间证书证书指纹
        # https://imququ.com/post/http-public-key-pinning.html
        add_header               Public-Key-Pins 'pin-sha256="YLh1dUR9y6Kja30RrAn7JKnbQG/uEtLMkBgFF2Fuihg="; pin-sha256="yz9Exfr7nuNjI2KbGJUzBjJ+jLLBlXm4jMjVcxT9jsw="; pin-sha256="3sWAZ33ibdUXCDLJsVsMf/yCP5WduqMI9lVcNo1vvd0=";  max-age=2592000;';

        add_header               Cache-Control no-cache;
        add_header               X-Via AQ;
        add_header               X-XSS-Protection "1; mode=block";
        add_header               X-Powered-By eiblog/1.3.0;

        proxy_ignore_headers     Set-Cookie;
        proxy_hide_header        Vary;

        proxy_set_header         Connection       "";
        proxy_set_header         Host             razeen.me;
        proxy_set_header         X-Real_IP        $remote_addr;
        proxy_set_header         X-Forwarded-For  $proxy_add_x_forwarded_for;

        proxy_pass               http://127.0.0.1:9000;
    }
}

server {
    server_name                  www.razeen.me razeen.me blog.netcj.com;
    server_tokens                off;

    access_log                   /dev/null;

    if ($request_method !~ ^(GET|HEAD|POST|OPTIONS)$ ) {
        return                   444;
    }

    # letsencrypt file verify
    location ^~ /.well-known/acme-challenge/ {
        alias                    /www/blog/challenges/;
        try_files                $uri =404;
    }

    location / {
        rewrite                  ^/(.*)$ https://razeen.me/$1 permanent;
    }
}
测试
MySSL.com检测A+,整体配置过关。
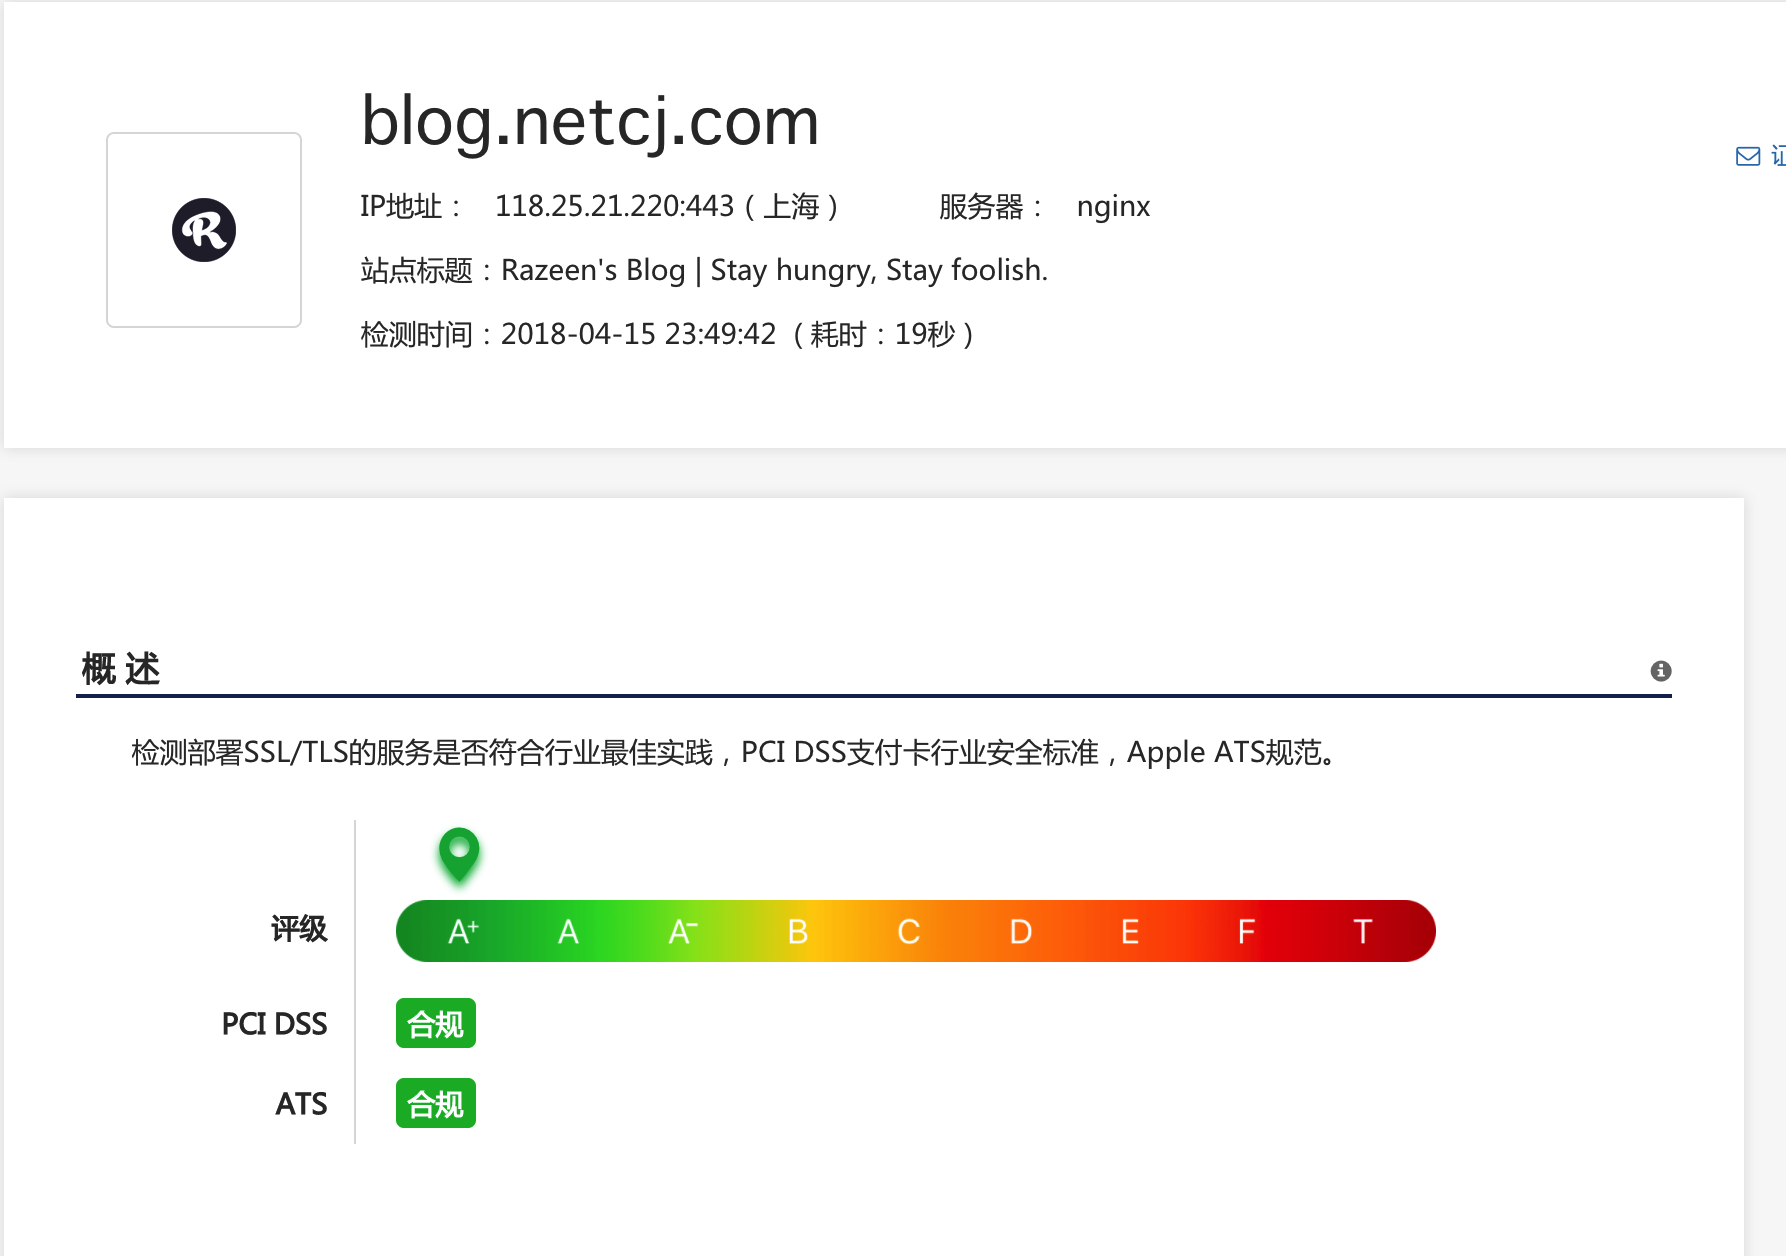
再用工具测一下了.
工具:testssl
安装与测试:
git clone --depth 1 https://github.com/drwetter/testssl.sh.git
cd testssl.sh
./testssl.sh -p https://blog.netcj.com
结果:
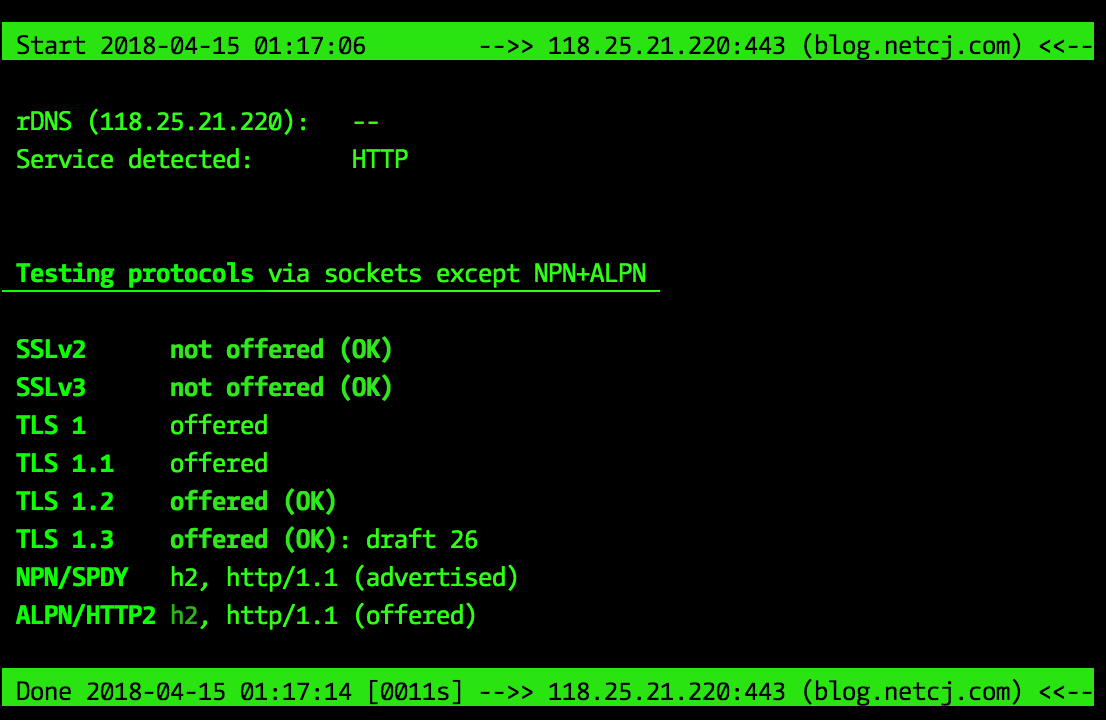
嗯,到这里就我的博客就支持最新的TLS1.3拉~。